Public key authentication for Git users
08 Jul 2013Users of Git, particularly with cloud-based services such as GitHub, CloudBees, and Heroku, must have a very basic understanding of public key authentication and encryption. This article provides a minimal introduction along with a few use cases.
Private keys
To understand public key authentication and encryption, it helps to understand “private” key encryption. The canonical example of private key encryption is the Caesar cipher, in which each letter is replaced by a letter a fixed distance away from it in the alphabet. For example:
A -> C
B -> D
C -> E
:
So, the word “DOG” is encrypted as “FQI”, and the private key, which both sender and receiver must know, is “2”.
The need for both sender and receiver to know the private key creates the need for a secure channel to communicate it. This makes private key encryption useless for online applications, since if we have a secure channel already, we can just use that to do the communication.
Public key encryption
Public key encryption requires a pair of keys: a public key and a private key. The key property of these key pairs is that if a message is encrypted with one of the keys, then you can decrypt it only if you have the other key. In general, the user keeps their private key(s) private, and allows anyone access to their public key(s). This solves the problem with private key encryption because there is no need for a secure channel with which to communicate the public key.
So, for example, if you want to send user Foo an encrypted message, you get their public key, use it to encrypt your message, and send the encrypted message to Foo, who can decrypt the message using their private key.
More importantly for Git users, public key encryption can be used to authenticate identity. Let’s say you are Foo, and you want to send a message to Bar. To prove to Bar that you are Foo, you encrypt a standard message using your private key, then send it to Bar. If Bar can decrypt it using your public key, then Bar knows you must have had access to the private key, and thus you are Foo.
An aside: Making the keys
The most popular method is called RSA after the initials of its inventors (Ron Rivest, Adi Shamir and Leonard Adleman). To generate a pair of keys the procedure is:
- Generate three large (a few hundred digits) random primes. Call the largest s and the other two x and y.
- Set N=x*y
- Choose p such that ps mod (x-1)(y-1)=1
It is possible to prove that, with N, p and s chosen in this way, M**ps mod N=M for all messages M. But you don’t really need to know the theory; all you need to understand in practice is that it’s really, really hard to figure out the private key given just the public key and/or some example decryptions. Thus, as long as you keep your private key truly private, public key encryption is a really good way to provide secure communication and authentication.
Public keys and Git
When transmitting source code and other artifacts between (for example) your local work space and the GitHub hosting service, the git protocol uses SSH for communication. SSH, in turn, relies on public key encryption for both authentication and secure communication of the data. So, one of the parties to git-based communication needs to have both a public and private key, and the other party needs to be given a copy of the first party’s public key.
Here is the golden rule of git-based communication: The originator of a git command must have both a public and private key, and must have previously provided a copy of their public key to the receiver of the git command.
This should seem intuitive and obvious at this point: when invoking git to either push or pull code from a remote repository, you are sending a command to the remote service, who will want to authenticate you. It authenticates you by already having a copy of your public key, so that it can decrypt a message the underlying SSH protocol has encrypted using your local private key.
GitHub has published an excellent article called “Generating SSH Keys” which provides the details on how you create public and private keys on all platforms. I recommend you read the GitHub article if you aren’t familiar with the details of public and private key creation.
Let’s now quickly look at a few different use cases to see how the golden rule plays out in practice.
Use Case: Local Workspace to GitHub
The simplest use case is the typical situation with GitHub: you have created some code in your local work space, and you want to push it to GitHub. In terms of the golden rule, you are the originator of the git command. Here’s a picture to make that more clear:
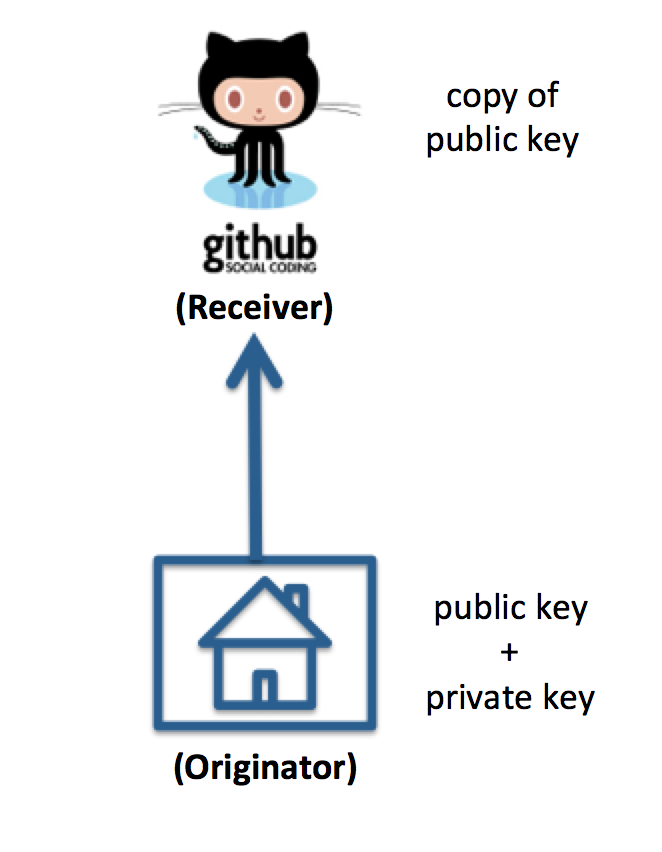
Your local work space is “home”, and since you are the initiator of the git command, you must have both a public and private key and must have given GitHub a copy of your public key.
Use Case: CloudBees to local workspace
Here’s a slightly different situation: you are using the CloudBees platform, and have used their “ClickStart” facility to create an example application in the cloud. Now you want to download the code generated by CloudBees to your local work space. Here’s a picture:
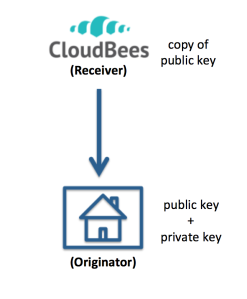
As you can see, there’s not really much difference in this use case. In terms of the golden rule, you are still the originator of the git command. Since you are initiating the git command, you need to have a public and private key and have communicated your public key to CloudBees prior to downloading the code. Here is their documentation on this issue.
Use Case: Continuous Integration
This is the most interesting use case. Assume you want to set up continuous integration, in which CloudBees pulls code from a GitHub repository whenever a change is pushed to that repo, then builds and tests the system automatically. Here is an illustration:
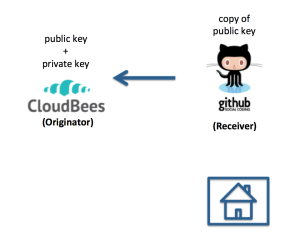
In this case, your local public and private keys are unimportant. In terms of the golden rule, CloudBees is the originator of the git command. When you created your CloudBees account, CloudBees generated a public and private key for use with that account, and so you must find the CloudBees-generated public key for your account, copy it, and provide it to your GitHub account. Once that is done, CloudBees can successfully initiate git requests from GitHub.