Eclipse configuration guide
Download and install Eclipse
Download and install Eclipse 4.3 (Kepler) from http://www.eclipse.org/downloads/.
Choose “Eclipse IDE for Java Developers”.
Do not install it into a file path containing spaces, such as (on Windows) c:\Program Files. Instead, install it in c:\eclipse, c:\ics314\eclipse, or whatever.
If you already have an older version of Eclipse installed, delete your ~/workspace/ directory. Eclipse 4.3 has a bug that causes auto- completion to not work when the libraries in older versions of the workspace directory are found on startup. The simple solution: delete the workspace directory. You will have to re-import your projects, but this guarantees your environment is OK.
Install the ICS-SE Java formatter
This simplifies the creation of Java programs that satisfy our formatting conventions. Download eclipse.format.xml to your local computer.
In Eclipse, select “Eclipse / Preferences / Java / Code Style / Formatter” to bring up the following window:
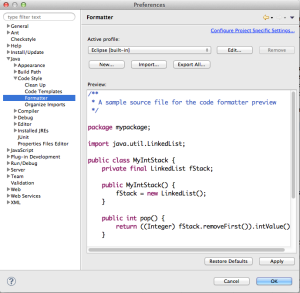
Now click “Import” and choose the file you just downloaded.
The “active profile” should now change to “ICS-SE”. Click “OK”. Now when you are editing Java source code, you can invoke “Source / Format” to reformat the Java source code according to our class conventions.
Install the Web Tools Extension
This provides better editing support for HTML, CSS, and XML. Install the Web Tools Extension:
-
Select Help Install New Software… - In Work with:, select “Kepler - http://download.eclipse.org/releases/kepler”
- Scroll down through the list of packages, and click the triangle to expand the “Web, XML, Java EE and OSGi Enterprise Development” section.
- Now select three packages to install:
- Eclipse Java Web Developer Tools
- Eclipse Web Developer Tools
- Eclipse XML Developer Tools.
- Click “Next” to continue with the installation.
- Follow the prompts to finish the installation.
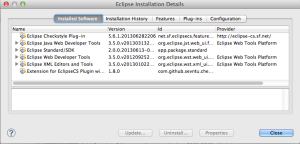
When you are finished and have restarted Eclipse, you can go to “About Eclipse / Installation Details” to verify that it’s been installed. Here’s the installation details window showing the installation of the tools:
Install Word-Wrap Plugin
For editing HTML, it is very useful to have “soft” line returns. The Eclipse Word-Wrap Plugin supports this feature in all Eclipse editors. Follow the instructions in the above link for installation into Kepler 4.3.
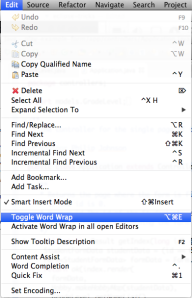
If successfully installed, then “Toggle Word Wrap” will be an option in the Edit menu:
Install Checkstyle
Like the formatter, Checkstyle helps ensure that your code implements our class coding conventions. Follow the instructions at http://eclipse-cs.sourceforge.net/downloads.html to install the Checkstyle Plugin for Eclipse.
You can install both the “Eclipse Checkstyle Plugin” as well as the “Extension for EclipseCS Plugin with Additional Checks”. To verify, go to “About Eclipse / Installation Details”. The window above shows the Checkstyle plugin.
Install the ICS-SE Checkstyle Ruleset
This task configures Checkstyle to our class’s specific coding conventions. Note: if you are updating checkstyle.xml rather than installing it for the first time, the easiest way is to simply delete all current projects from Eclipse, then delete the current checkstyle.xml configuration, then download and install the new version following the instructions below.
Download checkstyle.xml to your local computer.
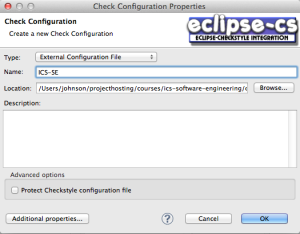
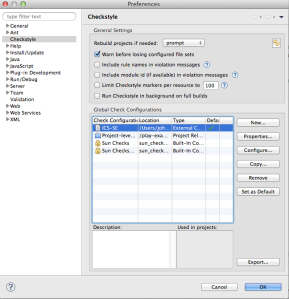
In Eclipse, select “Eclipse / Preferences / Checkstyle”, then click “New..” to bring up the “Check Configuration Properties” window. Select “External Configuration File” as the Type, provide “ICS-SE” as the Name, and browse to the file to fill the Location field.
The resulting dialog box should look like this:
Now click “OK” to load that configuration and return to the Checkstyle Preferences window. In that window, select the ICS-SE configuration and click “Set as Default”. The resulting dialog box should look like this:
Click OK to save these changes. Now the Project Properties dialog will include a Checkstyle pane where you can activate, deactivate, and customize the application of Checkstyle, as illustrated here:

Configure editors
We never want tabs in our files. We always want indentation to be two spaces. The standard file width is 120 characters. Here’s what you need to do to get that in Eclipse for the files we’ll be working on.
In “Eclipse / Preferences / General / Editors / Text Editors”:
- Check “Insert spaces for tabs”
- Check “Show print margin”, and set the print margin column to 120.
- Click “Apply”
In “Eclipse / Preferences / Ant / Editor / Formatter”:
- Set Tab Size: to 2
- Uncheck “Use tab character instead of spaces”
- Set Maximum Line Width to 120.
- Click “Apply”.
In “Eclipse / Preferences / Web / CSS Files / Editor”:
- Set Line Width to 120.
- Check “Indent using spaces”
- Set indentation size to 2.
- Click “Apply”.
In “Eclipse / Preferences / Web / HTML Files / Editor”:
- Set Line Width to 120.
- Check “Indent using spaces”
- Set indentation size to 2.
- Click “Apply”.
In “Eclipse / Preferences / XML / XML Files / Editor”:
- Set Line Width to 120.
- Check “Indent using spaces”
- Set indentation size to 2.
- Click “Apply”.
Now click “OK” to exit the Preferences dialog.
Configure file associations
We want to make sure the right type of editor comes up when we double click on a file name in an Eclipse project. In “Eclipse / General / Editors / File Associations”:
- Select the “*.html” file type in the upper window, then select “HTML Editor” in the lower window and click “Default”.
- Click “Add”, type “*.xml” as the file type, click “OK”. In the lower window, select “XML Editor” and click “Default”.
- Click “Add”, type “*.md” as the file type, click “OK”. In the lower window, click “Add”, select “Text Editor”, and click “OK”.
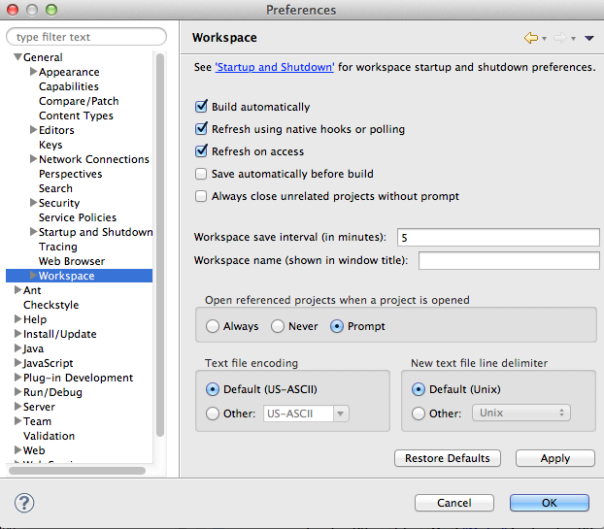
Enable “refresh using native hooks”
During Fall, 2013, we found that Play Framework integration with Eclipse was dramatically improved if the workspace option “Refresh using native hooks” was enabled. Find this under “General / Workspace”, and enable it as shown below:
Eclipse hacks (experts only)
If you want to get into more advanced Eclipse hacking, here are some posts to look at. Novices beware!
The tips that made a difference for me:
- In “Eclipse / General / Startup and Shutdown”, unselect “Marketplace Client” and “Equinox Provisioning Platform Automatic Update Support” from the plugins activated on startup. That reduced my startup time from 10 seconds to 7 seconds.
- In my eclipse.ini file, I changed -Xms from 40m to 512m. This allocates much more memory to Eclipse on startup by default. Reduced my startup time by about a second.
Verify reasonable startup time
You must configure your environment so that Eclipse boots in less than 10 seconds. If Eclipse takes more than 10 seconds to start up after a cold boot of your OS, the most likely problem (if your laptop satisfies the class requirements) is that you have antivirus software installed and you have enabled scanning of compressed files. Note that Eclipse loads a great number of compressed (jar) files. If you have antivirus software installed that scans compressed files when loaded, the startup time for Eclipse will be intolerable. To fix this, configure your anti-virus software to not check compressed files from any Eclipse-related directories).
This class will involve a large number of timed exercises. If Eclipse does not load quickly, you will be at significant disadvantage.